Creating Laser Cut Voronoi Panels in Fusion 360
- Vladimir Mariano

- Oct 9, 2020
- 3 min read
Updated: Jul 14, 2021
I regularly post Fusion 360 tutorials and projects to my youtube channel.

Fusion 360 is my ultimate design tool when creating models for 3D Printing, laser cutting, and CNC milling. It is truly amazing how much you can do in this one program. And just when you think you’re beginning to understand the full capabilities of this software, you discover plugins.
Fusion 360 plugins allow for even more functionality within an already jam-packed piece of software.
Let’s look at one specific plugin - The Voronoi Text Generator.
BTW, In addition to this blog post, I have linked a video below where I go step by step into installing and using the plugin to design the panels.

After quickly becoming experts in creating online classrooms we teachers then had to just as quickly figure out how to transform our physical classrooms into pandemic safe zones.
A makerspace is by definition a collaborative space that is intentionally designed to encourage group work - collaboration, sharing of ideas, peer-learning - so this feels very counterintuitive.
Plastic barriers or ‘sneeze guards’ are now a common sight at grocery stores and the classroom. I needed to install one between computers but because we are still a makerspace, I like to incorporate design into functional items when I can. It’s a way of reminding students that you can be creative with anything.
So instead of installing a plain sheet of plastic, I decided a voronoi panel would be much more aesthetically pleasing.

I used the Fusion 360 Voronoi Sketch Generator plugin to make the process as simple as possible. This saved me from having to sketch out the design of the panels.
The plugin is very easy to use.
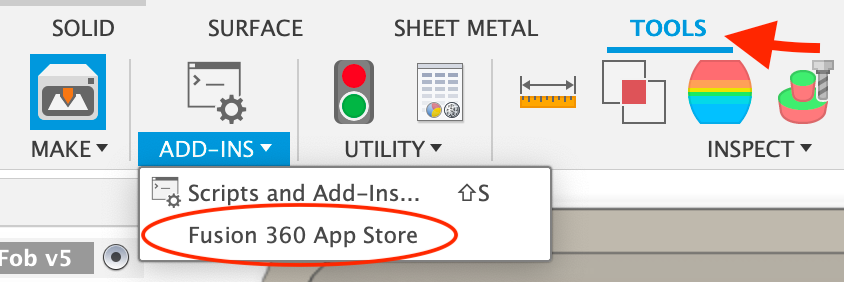
You first have to install it by going to the Tools tab, click on Add-ins and select Fusion 360 App Store. This will take you to the app store website where you can simply type “voronoi” in the search bar. Select the ‘Voronoi Sketch Generator’ app and then select whether you are using a Mac or a PC.
After installing the program, restart Fusion 360 and you’ll now have an extra tool in your Create Menu called ‘Voronoi Sketch Generator’.

Within the tool, you can simply choose from a few options such as the style, size, and scale of your pattern and it magically creates the design for you. The best way to see the difference between the options is to simply play around with the features and see what happens.

In the video below I go through a tutorial on how I used this feature to create my design and then laser cut the pattern using ⅛” birch plywood and PET plastic sheet (ordered from Mcmaster-Carr). The PET was originally bought for laser cutting face shields. I ended up sandwiching the PET plastic between two layers of laser cut plywood.
I’m very happy with the way the panels came out. I hung these from the ceiling with clear string and it gives them a floating look which adds to the cool factor.
Watch the video below to see how everything came together and a step by step on installing the Voronoi Sketch Generator plugin and using it to design the panels.
My big aha! moment with Fusion 360 happened when I finally understood how to use Constraints. Get my free Fusion 360 Constraint Cheat Sheet and see what I mean.
Enjoy!


Comments